
A ceiling leak should never be ignored because even a small water stain can quickly turn into mold and structural damage.
Water keeps moving long after the visible drip stops. By the time a stain appears, the leak has often been active for days or even weeks.
That is why fast action matters.
A proper ceiling leak repair finds the source and removes trapped moisture. It prevents mold growth, and restores damaged materials before bigger problems develop.
Common Causes of Ceiling Leaks
Ceiling leaks happen because of the following causes:
Roof Damage
Roof problems are one of the leading causes of ceiling leaks. Common issues include:
- Missing shingles
- Cracked flashing
- Damaged roof vents
- Storm damage
- Aging roofing materials
Plumbing Leaks
A leaking pipe upstairs can create ceiling damage downstairs. Common plumbing causes include:
- Burst pipes
- Loose fittings
- Leaking drain lines
- Toilet seal failures
- Water supply line leaks
HVAC Problems
Air conditioning systems create condensation. When drain lines clog or drip pans overflow, water can leak into ceilings.
In warmer climates, HVAC-related leaks are a frequent source of ceiling damage.
Water Heater Failures
A leaking water heater can release a surprising amount of water. If the unit sits in an attic or upper floor utility closet, the leak may show up as ceiling damage below.
The first sign is a stain rather than visible water.
Appliance Leaks
Modern homes contain more water-connected appliances than ever before. Potential culprits include:
- Dishwashers
- Washing machines
- Refrigerators with ice makers
- Water filtration systems
Early Water Damage Signs
Most ceiling leaks give small warning signs. Knowing them can save thousands in repairs.
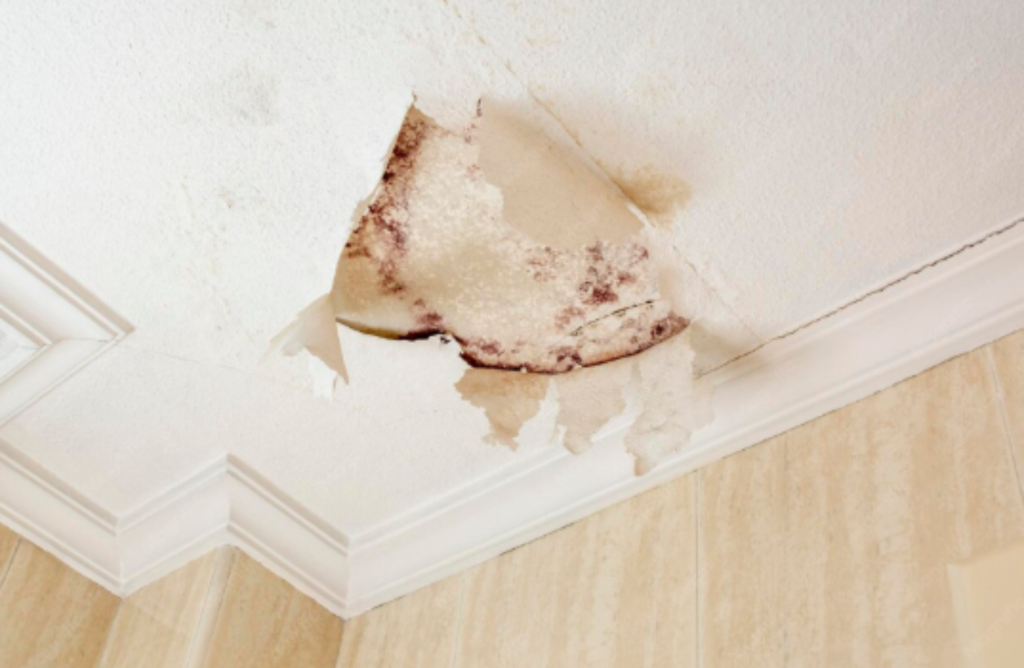
Small Brown Stains
This is often the first visible clue. The spot may look harmless at first. Usually, it is not.
Brown or yellow stains form when water moves through drywall. It carries dirt, rust, and other materials. These stains often mean moisture has already reached inner layers.
The visible mark is usually smaller than the actual damage. If the stain keeps growing, the leak is likely active.
Peeling Paint
Paint needs a dry, stable surface. Water changes that quickly. As moisture enters drywall, paint loses its bond. Small bubbles often appear first. Later, paint may crack or peel away.
This happens because trapped moisture pushes outward. Many homeowners repaint the area. But this doesn’t help, because the stain often returns.
That means the leak was never fixed.
Musty Odors
A musty smell is an important warning sign. Sometimes it appears before any visible damage. That odor often comes from mold growth.
Mold releases microbial volatile organic compounds, called MVOCs. These gases form as mold grows and feeds. The smell can travel through walls and ceilings. As a result, the odor source may seem impossible to find.
If a room smells damp consistently, hidden moisture may be present.
Sagging Ceiling Areas
Drywall becomes heavy when wet. As water builds, the ceiling starts to bow downward. A saturated ceiling can hold a surprising amount of water.
Drywall may hold roughly one gallon of water per square foot. A sagging area measuring two square feet may contain over 15 pounds of water. That weight stresses fasteners and framing.
In severe cases, sections can collapse without warning. So, it’s crucial that you do not stand beneath a sagging ceiling.
Cracks That Suddenly Appear
If you see new cracks, pay attention, especially when staining is also present. Moisture changes how drywall expands and contracts. This repeated movement is called moisture cycling.
Over time, stress develops around drywall seams. Hairline cracks often appear along joints first. They may look cosmetic, but they sometimes point to a hidden leak nearby.
When Multiple Signs Appear Together
Pay close attention if you notice:
- Stains and musty odors
- Peeling paint and cracking
- Sagging and discoloration
- Odors and recurring stains
These combinations often suggest active moisture behind the ceiling. The sooner the issue is inspected, the easier repairs usually become.
What to Do Immediately After Discovering a Ceiling Leak
Quick action after discovering a leak helps reduce damage and repair costs.
Step 1: Stay Safe First
If water is near electrical fixtures, be careful. Watch for:
- Ceiling lights
- Fans
- Smoke detectors
- Electrical outlets nearby
If there is any risk, turn off power to the area. Do not stand under a sagging ceiling.
Step 2: Move and Protect Belongings
Next, protect anything below the leak. Move furniture if possible. Also remove:
- Electronics
- Rugs
- Artwork
- Books
- Personal items
If something cannot be moved, cover it with plastic sheeting.
Step 3: Relieve Ceiling Pressure Carefully
Look closely at the ceiling. Is it bulging or swollen? A visible bubble means water is trapped inside. Too much pressure can cause the entire section to fail.
If water is clearly pooling inside the ceiling, place a bucket below. Then carefully puncture a small hole at the lowest point. Use a screwdriver for this.
The water can drain in a controlled way. This reduces the chance of a larger ceiling collapse. Only do this if the bulge is clearly visible and safe to access.
If the area appears unstable, wait for professionals.
Step 4: Document the Damage
Before cleaning, take photos and videos. Capture:
- Ceiling stains
- Active drips
- Water bubbles
- Damaged belongings
- Flooring damage
Try to document the source if visible. Good records help with insurance claims.
Step 5: Call a Restoration Professional
Call a restoration company first. IICRC-certified technicians can identify hidden moisture quickly.
They use:
- Moisture meters
- Thermal imaging cameras
- Humidity monitoring equipment
These tools help locate the leak source. At the same time, emergency drying can begin immediately.
A restoration company can also document damage for insurance purposes.Revive Pro Restoration handles both detection and drying. This helps stop damage from spreading while repairs are arranged.
How to Repair a Ceiling Leak
Here are all the steps you should take.
Step 1: Stop the Water Source
Repairs should never begin before fixing the leak. The source may be:
- A roof leak
- A plumbing leak
- An HVAC problem
- A water heater issue
If the leak remains active, repairs will fail.
Step 2: Dry the Area Completely
Wet drywall may look dry on the surface. However, moisture can remain trapped inside.
Professionals use:
- Moisture meters
- Air movers
- Dehumidifiers
Drying may take several days. Skipping this step often leads to mold growth.
Step 3: Remove Loose Material
Once dry, inspect the ceiling carefully. Remove:
- Peeling paint
- Loose drywall paper
- Flaking texture
- Damaged joint compound
A clean surface helps new materials bond properly.
Step 4: Apply a Stain-Blocking Primer
Water stains often bleed through regular paint. The yellow or brown mark returns later. A stain-blocking primer seals the damaged area first. This prevents “ghost stains” from reappearing.
Step 5: Repair Small Damaged Areas
Minor damage can often be repaired. Small cracks and holes may need:
- Joint compound
- Mesh tape
- Light sanding
Several thin layers work best. Thick applications often crack later.
Step 6: Replace Soft or Sagging Drywall
Sometimes patching is not enough. Replace drywall when it is:
- Soft
- Crumbling
- Sagging
- Mold-damaged
Water weakens drywall quickly. Once strength is lost, replacement is usually safer.
Step 7: Prime and Paint
After repairs cure completely, painting begins. Most ceilings need:
- Primer
- First coat of paint
- Second coat of paint
DIY Repair vs. Professional Repair
Some ceiling repairs are manageable for homeowners. These include:
- Small stains
- Minor paint damage
- Tiny drywall cracks
Professional help is usually best when:
- The leak source is unknown
- Mold is present
- Drywall is sagging
- Water affected electrical systems
- Large ceiling sections are damaged
A simple stain can hide major damage above. That is why professional inspections often save money later.
Revive Pro Restoration uses moisture detection tools and drying equipment to identify hidden damage before repairs begin. This helps ensure the ceiling is repaired correctly the first time.
Here is the expanded version of the section:
Can a Ceiling Leak Cause Mold?
Mold can definitely result from a leaky ceiling. Just one day after the leak, mold begins growing. Since the time for this growth is so short, checking for mold after the leak is paramount.
Ceilings create ideal conditions for mold growth because they often contain:
- Moisture from leaks
- Drywall paper
- Wood framing
- Insulation
- Dust and debris
- Limited airflow
These materials give mold both food and moisture.
What Does Mold Inside a Ceiling Look Like?
Mold may grow inside the ceiling cavity long before it becomes visible. When exposed, it often appears as:
- Black patches
- Green spots
- White fuzzy growth
- Gray staining
- Dark rings around wet materials
Common Mold Types Found After Ceiling Leaks
Several mold species commonly appear after water damage.
| Mold Type | Common Characteristics |
| Stachybotrys | Often dark or black and linked to long-term moisture |
| Aspergillus | Frequently found on drywall, insulation, and dust |
| Cladosporium | Common on wood, ceiling tiles, and painted surfaces |
Professional testing is often needed for accurate identification.
Health Risks of Mold Exposure
Common health effects include:
- Sneezing
- Coughing
- Nasal congestion
- Eye irritation
- Skin irritation
- Headaches
- Worsened asthma symptoms
- Increased respiratory discomfort
When Is Professional Mold Remediation Needed?
Homeowners can handle small mold spots themselves. But if the areas are larger, expert help is highly suggested. Small areas of mold can sometimes be handled safely. However, larger contamination often requires professional help.
EPA says that mold growth covering more than 10 square feet should be handled by trained remediation professionals.
Professional remediation may involve:
- Removing contaminated materials
- Installing containment barriers
- Using HEPA air filtration
- Applying antimicrobial treatments
- Monitoring moisture levels
- Verifying complete drying
Dry materials rarely grow mold. Wet materials often do. Once mold spreads inside a ceiling cavity, a simple repair can become a much larger restoration project.
When Is a Ceiling Leak an Emergency?
Some leaks can wait a few hours. Others need immediate attention. Knowing the difference can prevent major damage.
Signs You Need Emergency Help
Call for immediate assistance if you notice:
- Water actively dripping or pouring
- Ceiling sagging or bulging
- Water near electrical fixtures
- Multiple rooms affected
- Sewage-contaminated water
- Strong mold odors
- Structural movement or instability
Why Fast Action Matters
Water damage gets worse by the hour. Materials like drywall, flooring, etc. absorb moisture faster than most people realize.
The first 24 to 48 hours are critical. Mold begins growing during this window. That is why professionals respond quickly. The goal is to stop damage before it spreads.
What Emergency Restoration Actually Means
The emergency service starts the drying process immediately. Professionals use equipment such as:
- Commercial air movers
- Industrial dehumidifiers
- Moisture meters
- Thermal imaging cameras
- Air scrubbers when needed
These tools help remove moisture hidden from view.
The Importance of the First 48 Hours
The restoration industry follows the IICRC S500 standard. This is the leading water damage restoration guideline. The standard emphasizes rapid drying.
This is because the moisture spreads quickly through building materials. Delays increase the chance of:
- Mold growth
- Material deterioration
- Odors
- Structural damage
- Higher repair costs
When Costs Can Rise Dramatically
Some leaks affect more than drywall. Water may reach structural components. This can include:
- Ceiling joists
- Roof framing
- Attic insulation
- Subflooring above
- Load-bearing supports
Once these materials become wet, repairs grow larger. Drying takes longer. All this increases the replacement costs dramatically.
Need Emergency Ceiling Leak Help?
Revive Pro Restoration responds 24/7 throughout San Diego and Los Angeles. Emergency inspections help identify the source quickly.
Fast drying can reduce damage and repair costs. Call us today for an emergency ceiling assessment before the problem gets worse.
FAQs
How Do I Know if My Ceiling Leak Is From a Roof or Plumbing?
The location of the leak can provide clues. Roof leaks often appear after rain and usually form near exterior walls or attic spaces. Plumbing leaks can happen anytime and are often below bathrooms, kitchens, or laundry rooms. The exact source is not always obvious. A professional inspection can quickly identify where the water is coming from.
Can Ceiling Water Damage Cause Mold?
Yes, it can. Mold can begin growing within 24 to 48 hours after water exposure. Ceiling cavities often trap moisture, creating ideal conditions for mold growth. A musty smell is often one of the first signs. Fast drying and repairs help reduce the risk. Delaying cleanup can allow mold to spread behind drywall and insulation.
How Long Does It Take to Dry a Water-Damaged Ceiling?
Most water-damaged ceilings take 3 to 5 days to dry. However, the timeline depends on the amount of water and the materials involved. Heavy saturation may take longer. Professionals use air movers, dehumidifiers, and moisture meters to track progress. The ceiling should be completely dry before repairs or painting begin.
Should I Pop a Ceiling Bubble Full of Water?
If the ceiling is visibly bulging with trapped water, carefully draining it may prevent a larger collapse. Place a bucket underneath and puncture the lowest point with a screwdriver. However, only do this if it is safe. Water near electrical fixtures or severe sagging requires professional help immediately.
How Much Does It Cost to Repair Ceiling Water Damage?
The cost depends on the cause and extent of the damage. Minor repairs may cost a few hundred dollars. Larger repairs involving drywall replacement, mold remediation, or structural work can cost several thousand dollars. The final price also depends on labor rates, materials, and whether the leak source needs repair.
Is Ceiling Water Damage Covered by Homeowners Insurance?
Often, yes. Most homeowners insurance policies cover sudden and accidental water damage, such as a burst pipe or appliance failure. Damage caused by long-term neglect or unresolved leaks is often excluded. Coverage varies by policy. It is important to document the damage and contact the insurance company as soon as possible.
When Is a Ceiling Leak an Emergency?
A ceiling leak becomes an emergency when it creates safety risks or is actively worsening. Signs include water pouring through the ceiling, major sagging, electrical hazards, sewage contamination, or multiple affected rooms. Fast action matters because mold can begin growing within days. The sooner drying starts, the lower the repair costs usually are.